by Heidi Schulz | Feb 9, 2012 | Heidi Bosses You, Make Me
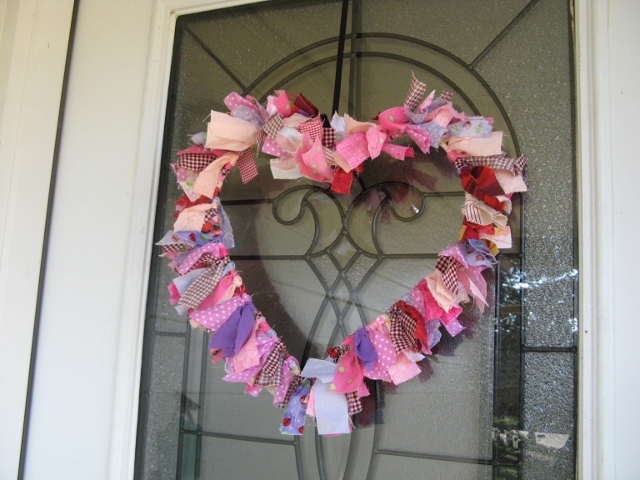
Last week, I asked you to help me select a project from my Valentine’s Day pin board so I could move beyond being nothing but a big ol’ pinner. I wanted to actually create something, not just dream. You chose the heart garland and I posted my completed project earlier this week. However, this adorable rag wreath came in second:
.
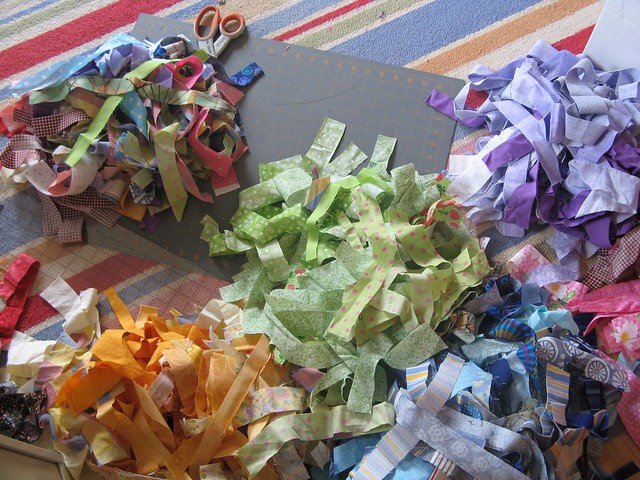
It just so happens that I have a ton of fabric strips left over from Newt’s quilt. Newt and I each decided to make a wreath.
The inspiration wreath used a purchased heart-shaped wire form. I didn’t know where to find one of those, but Walt’s closet has plenty of wire hangers.
I used wire cutters to nip off the hook and the part where the ends twist together. I then bent the hanger into a rough circle, overlapped the ends by an inch or so and used a generous amount of electrical tape to secure them together. Once the ends were secure, I bent the wire into a heart shape. If you make one, bear in mind that it does not need to be perfect. If one hump is a little larger than the other, don’t worry! Lots of girls have that issue. You won’t really be able to tell with all the fabric strips on.

We trimmed our fabric strips to about 1 – 1/2 inches wide and six inches long.
To tie the knot, fold your fabric strip in half. (It doesn’t matter if it’s right sides or wrong sides together.) slip the looped end under your wire. Take the loose ends, pull them over the wire and through the loop. Tighten and repeat with the next strip.
I really should have taken a picture of the actual knotting, but once we got started, neither one of us wanted to quit. This was one of those activities that your fingers just feel happy doing. Just pretend there is a picture here, k?
Keep adding strips until your heart is full. Ahhww!
Right at the top, in the ah, cleavage(?) of the heart, tie two loose ends together to create a loop for hanging. After hanging you can either fluff it up so the rags go every which way:

- Made by Newt
Or straighten them up so all the loose ends point out kind of:

- Made by Me
Ooh, this is fun. What should we make next?

Like this:
Like Loading...
by Heidi Schulz | Feb 7, 2012 | Heidi and Her Family, Heidi Bosses You, Recipes

I admit it. I’m prejudiced against sugar cookies.
Surprisingly, it’s not the white flour or white sugar that bothers me. I think there is room in our diet for the occasional treat – and homemade is always better.
It’s not they way they look, for sure. If they are decorated well, they are really cute.
However, I’ve always thought that cuteness was the only thing they had going for them. Flavor wise, they’re too bland and too boring. Beyond that they are messy and super time consuming to make.
Confession: I am also the teeniest bit afraid of trying my hand at icing. It looks hard.
My prejudices aside, we make sugar cookies – every year at Christmas.
Because our flood put me a few weeks behind in Christmas preparations, we didn’t get around to making any this year.
On Sunday, while Walt and Newt were watching the Super Bowl, I looked around online for a sugar-cookie recipe that might be tastier than sawdust. Once I found a promising recipe, I whipped up a batch and stuck it in the fridge.
Last night I surprised Walt and Newt with a family cookie making party.

See what I mean about messy?
I was going for Valentine’s Day cookies, but we ended up with a mishmash of holidays: hearts, bats, birdhouses and stars decorated with red and green sugar. Perhaps everyone was afraid that this would be the one and only sugar cookie making session of the year. They had to get their favorites in.
Want to know something though?
These cookies are actually really good.
They are firm enough to not crumble when dipped in my herbal tea, but still slightly soft. And that buttery taste with just a hint of lemon? Let’s just say, I now have a new outlook on sugar cookies.
I might even try icing them one day…Bee in Our Bonnet has the recipe I used, as well as fantastic decorating tips and tricks. The only modification I made to the recipe was using about a teaspoon of grated lemon zest instead of the lemon extract.
Like this:
Like Loading...
by Heidi Schulz | Feb 6, 2012 | Heidi Bosses You, Make Me
Last week, I lamented the fact that Pinterest was making me craft-lazy , but I knew I could change. So I posted several Valentine’s projects that I had pinned and asked you to pick one for Newt and me to make. This was the winner:
.
.
Adorable, no?
The garland that we made looks no where near as cute, but oh-well pretty much nothing like it. However, I do like the way ours turned out and it was fun to do a little crafting together.

Here’s how to make one like ours:
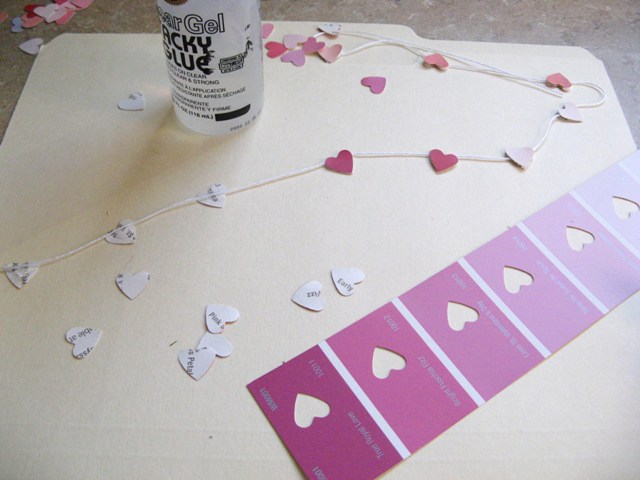
1. Go to the Wal-Mart paint department. Consider the colors… Choose reds, pinks and purple for Valentine’s Day.
I loved the colors on my inspiration garland, but was, um, less than inspired by the paint card choices at the store. Though I’m not sure I can entirely blame the paint cards – the whole process made me a bit nervous.
Look furtively around then slip several paint cards into your purse.
I know they are free, but I still felt a bit like I was up to no good (considering the fact that I had no intentions to buy their paint for this project). What are your thoughts? Is it ethical to take paint cards without intending to buy paint? #firstworldproblems
2. While at Wal-Mart, go look at their paper punches. They do not, have not, and likely will not ever have what is needed. Remember that you have a punch at home that will work.
3. Go home and dump out three baskets of craft supplies to find heart-shaped punch. Huh. It’s smaller than you remember. Make do.
4. Start punching. Realize that you do not want to poke a needle (twice each) through all those tiny hearts. Decide to glue. Realize that this will not only be easier, it will make your garland double-sided, perfect for hanging on a window. In your face, inspiration piece!

5. Lay several hearts, wrong side up on a piece of tag-board (which is fancy-speak for an old manilla folder). Put a dab of craft glue near the top of each heart. Lay a length of crochet thread (or whatever you have lying in a drawer somewhere) on top of the glue.

6. Place another heart wrong side down, sandwiching thread and glue in the middle. Allow to dry, then hang somewhere prominent so everyone can ooh-and-ahh over (or make crazy-eyes under) your “hard” “work”.

Total cost: $0 (if you have a punch, glue and thread buried in your crafting supplies).
Newt and I had so much fun, we also made the scrap fabric knotted heart wreath. I’ll share it later in the week.
What projects are you working on?
Linked with Works For Me Wednesday, Trendy Treehouse
Like this:
Like Loading...
by Heidi Schulz | Jan 30, 2012 | Heidi Bosses You, Make Me
Your attention please:

Since I spent the afternoon on my hands and knees grouting the master bath, and the evening playing a heated game of Phase 10  with Walt and Hannah (I won. By a lot.), I didn’t get around to writing today’s post.
I’m not one to send away a guest empty handed, so here are some great finds from around the internetz. Enjoy!
What I Would Feed my Family on a Monthly Budget of $250
This one got me thinking. I’m going to give it a shot. Watch for a post about how it goes.
Curried Carrot Soup
I can’t wait to try this. However, since Walt is neither a soup, curry, or carrot fan, I think I’ll have to wait until he has a night shift at the police department.
Or I could make it for lunch.
Or maybe make it for dinner alongside grilled cheese sandwiches. That way Walt could have soup and a sandwich, hold the soup…
No mater what, it will get made. And soon.
Seven Lies about Homeschoolers – Video
It’s funny because it’s true…
Doodling in Math: Spirals, Fibonacci, and Being a Plant – Video
Newt and I look forward to every new Vi Hart video on you-tube. We may not understand all of the mathematical principles that Vi talks about, but we enjoy watching. Math should always be this fun and interesting.
We Must See Past What it Seems…
I saved the best for last. This post was written a little over a year ago, which would make it about 147 years old in internet years. However, it is well worth revisiting. This is probably one of the most moving and outlook-changing things I have ever read. Go read it. You’ll be glad you did.
Like this:
Like Loading...
by Heidi Schulz | Jan 29, 2012 | Heidi Bosses You, Make Me
Does it seem as though the whole world has fallen deeply, madly in love… with Pinterest?
I love it too. Sometimes just looking at all of those bright, shiny ideas of what I could cook, organize, create or decorate just fills my little heart with glee.
re-pin
re-pin
re-pin
[big happy sigh]
When I was a teenager, I learned some pretty wise words of uh… wisdom from Poison’s Brett Michaels. Sing it Brett!
Every rose has its thorn,
Just like every night has its dawn,
Just like every cowboy sings a sad, sad song…
Every rose has it’s thorn.
Yeah it does.
Pinterest’s thorn is this:
Sometimes, just pinning makes me feel creative enough.
It’s rare that any of those wonderful ideas ever live outside my pin-board.
Let’s remedy that, shall we?
I’ve spent the evening combing Pinterest for ideas of Valentine’s crafts to do with Newt. My only criteria was that it be something simple to create and inexpensive. There was no shortage of ideas:
.
.
.
Newt and I will recreate one of these crafts this week and report back next Monday. Here’s the really fun and exciting part: You get to pick which one!
Disclaimer: The previous statement is likely false. You may find this idea neither fun or exciting. Humor me, would you?
Leave your pick in the comments.
Like this:
Like Loading...
by Heidi Schulz | Jan 25, 2012 | Heidi Bosses You, Recipes
One chicken, three meals:
#1 Sweet and Spicy Glazed Chicken
#2 Cranberry Walnut Chicken Salad
We are coming to end of this chicken, but can you believe how far we’ve been able to make it stretch?
Today, we’re talking stock (or broth). Chicken stock is truly a wonderful thing to make. Like my homemade veggie stock, it’s made with the scraps that you would otherwise throw away. At the store stock costs about $3 a quart. One chicken carcass (ew) will make me about a half gallon of stock. Not only is it cost effective, it tastes wonderful – far better than what you could buy, you know exactly what is in it, and costs far less.

Here’s how to make it:
Take your chicken carcass and put it in your largest stock-pot (see why it’s called that now?).
Fill pot with cold water.
Add a generous splash of white or apple cider vinegar. This will help to break down the bones and add more minerals to your stock. Let set for about a half an hour, then add chunks of celery, carrot, onion and garlic. No need to peel anything (even the onion and garlic); just give it a good scrub and a rough chop before dropping it in all the pot.

Turn on burner to high and bring to a good rolling boil, then reduce heat to simmer. Simmer for anywhere from 12 to 36 hours, adding more water as necessary. When you see foam forming on the top, skim it off with a spoon and discard.

In the last hour or two of cooking, feel free to throw in some herbs, if desired: parsley and thyme are my favorites.
Warning: Your house will smell wonderful. Make sure you have something good planned for dinner.
After you have simmered your stock for the desired amount of time, remove from heat and allow to cool. This will make it easier to handle.
Strain through a colander. If you prefer a more clear stock, you can line your colander with linen, but I usually don’t bother.
Pick through the bones and separate the meat. Store in fridge or freezer. Discard everything else (even the veggies – there is nothing of value left in the. It’s all in your stock).
There will likely be a layer of fat on the top of your stock. I generally leave it, but if you find that it makes your finished stock too oily, just place the entire bowl in the fridge. The fat will rise to the surface and harden. It can then be picked off and thrown away. (Or used to make chicken gravy.)
I like to put my finished stock in wide mouth quart jars and freeze until needed. Just don’t overfill or they could burst in the freezer. Leave a couple of inches of headroom.
I made soup with our stock for lunch yesterday.
Full disclaimer, this was actually made with turkey stock. The chicken stock wasn’t quite ready, but it smelled so good… I went to the freezer and pulled out some leftover meat and turkey stock I had made after Christmas. While it was thawing, I had Newt cut some kale from the garden. This, I sauteed with celery, carrot, onion and garlic. I added the stock, meat, a handful of pasta (though rice or barley are also good), and salt and pepper.

Lunch was on the table in less time than it would have taken to heat up frozen fish sticks.
If you have never tried cooing a whole chicken before, I hope you are feeling a little more confident about it. None of the dishes I made this week required a whole lot of special skills or equipment, but each one of them tasted great. Go ahead and try it. Don’t be chicken!
Linking with: Making it With Allie, A Crafty Soiree , Works for Me Wednesday and Trendy Treehouse: Create and Share
Like this:
Like Loading...